
At Toolmates, we’re always looking for clever ways repurpose leftover materials and pallets are a gift from heaven when it comes to creating awesome things in and around the garden.
Pallets are a DIY fan’s best friend, and if you have a little bit of time to hunt around, pallets can be found at the back of most stores around the country – simply waiting to be repurposed and loved once again.
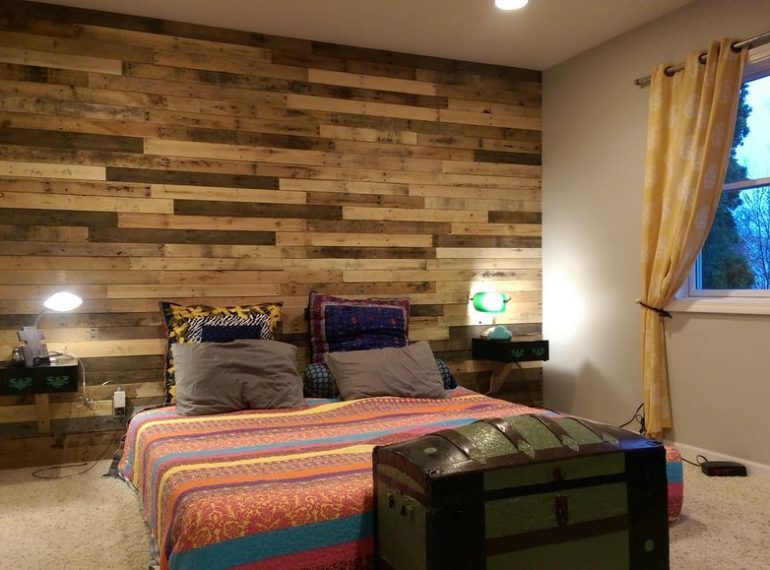
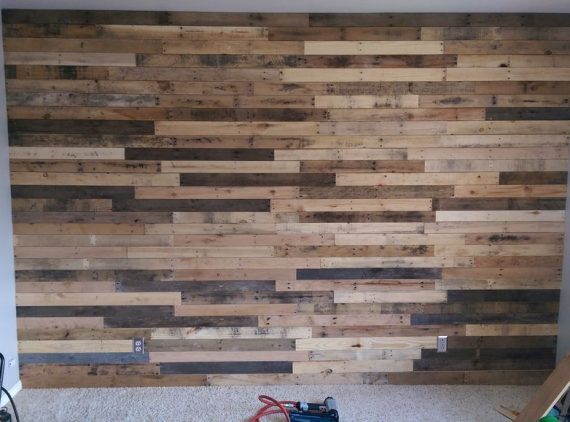
So why not add some much-needed love to your home or property by adding a feature wall from your leftover pallets!
Check out these simple steps for creating a feature wall from pallets and tap into the wonders of a wall of wooden goodness in your backyard.
What you will need to create your pallet wall:
| Tools | Materials |
|---|---|
|
|
STEP 1
nFind some pallets
We strongly recommend asking for them, rather than simply backing your truck up and taking them. Pallets still hold value and some stores repurpose or reuse these wooden gems themselves. If you have a quick look around your local hardware store, Bunnings, tile shop or any store that stocks and receives heavy items in pallets, you should be able to find plenty to suit your needs.
So you will need to collect about 30-40 pallets depending on your wall size, for example, to cover a 6” x 10” area, you will need approximately 30 pallets. They can be a wide range of styles and don’t need to be uniform, mix and match and add a bit of personality to your pallet wall.
STEP 2
nDismantle the pallets with care
Although to many this may look like fun, it is a very tough smashing the pallets into shards without doing damage to them, so be sure to take it easy during this process.
To get your pallets ready for you to assemble into a pallet wall, take a hammer and a crowbar to easily loosen and remove all the planks, ensuring you take care with the nails and remove them all, you don’t want rusty nails throughout your pallet wall so take the time to get everything looks schmick.
STEP 3
nArrange your boards in the formation you want for your wall
Your boards may have come from a range of different pallets; this can leave you with a range of different length and width boards, however, this can add ‘a bit of uniqueness to your wall design. You now need to arrange your boards into their lines, as they will go up on your wall. You will, however, want all the boards in a row to be the same height; otherwise your wall will be wonky – have a play around with the design and lay it out before you nail everything together.
STEP 4
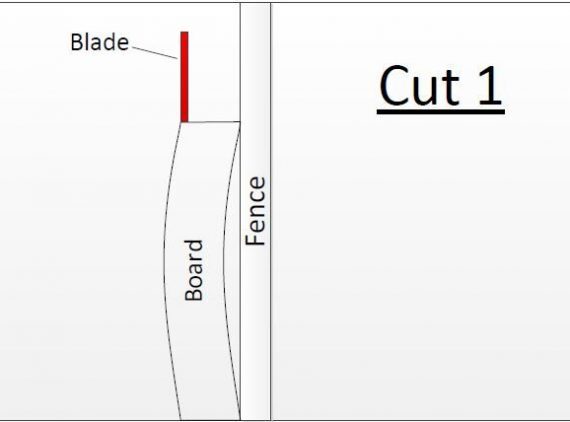
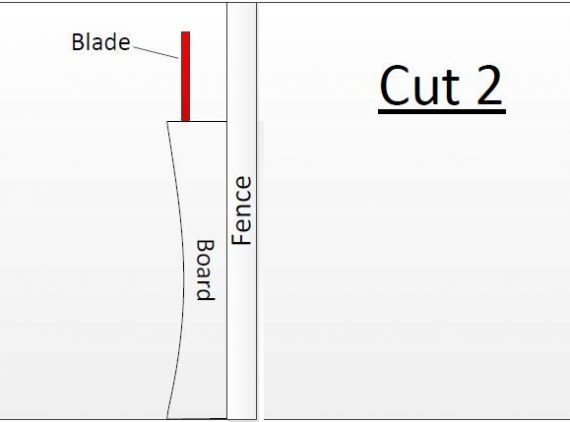
nMake sure the boards are straight
One of the issues with pallet boards is often they are quite bowed, you will need to use a table saw here to get them straight. It should only take a few rounds, and the boards will straighten right up. Place the bow against the fence and set it all up so it can take enough to straighten up the board and make them usable. The cool thing about this project is that it should still look rugged and ‘shabby chic’ in many ways – you can leave things a little rough.
STEP 5
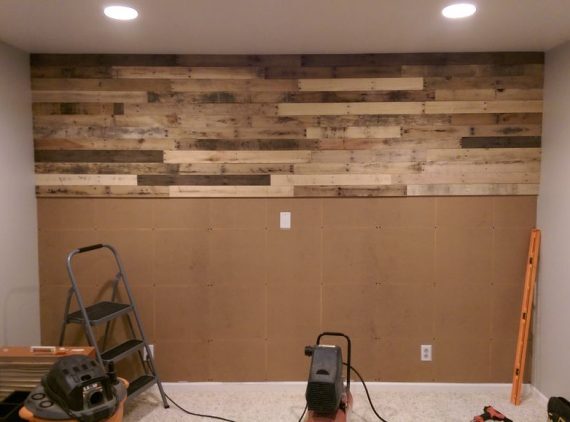
nSet up a backer board
To ensure that you don’t take everything off with you, especially if you have plasterboard up, place some 1/8 MFD in front of your drywall so that you can simply remove the board should you want to take your creation down as some stage without pulling off your drywall with holes riddled through it as well.
STEP 6
nNow it’s time to put up your wall!
Having prearranged your boards in line groupings before you took the bows out of the wall, you should install always starting from the top and work your way down. Use liquid nails or construction adhesive glue to set the boards in place, always ensuring they are straight with a spirit level. Punching a nail in each end will assist in keeping the boards in place as the adhesive dries on the wall.
STEP 7
nDon’t forget to negotiate around power outlets
Should you encounter a power outlet on the way down you should heard to your hardware store and purchase outlet extenders which will allow you to adjust the thickness of the power point to suit that of your new wall. Don’t be lazy and just lay your planks over your power points, that will come back to haunt you later on.
If you find your wall has a rise or fall in the roof heights – which many houses have – you will be able to hide this better if you leave the tapered cut facing the bottom. Also when you have floor carpet this will also help distracting people away from the difference in plank width. Have a play around with this to make sure your pallet wall is perfect for your space.
With all of this done, it is now time to sit back and enjoy your new, customised and durable plank feature wall. If you wanted to add a little more durability, add a coat of clear stain or sealant, which will add years to your wall. This should be done after a quick sanding down of the wall to ensure you remove any splinters that you wouldn’t want to end up in your hands or the back of your head as you move around your room.
If you’re looking to hire or rent out your tools to local DIY lovers in your area check out Toolmates.com.au and find out more about how we connect DIY lovers with tools throughout your community.
Leave a Reply