
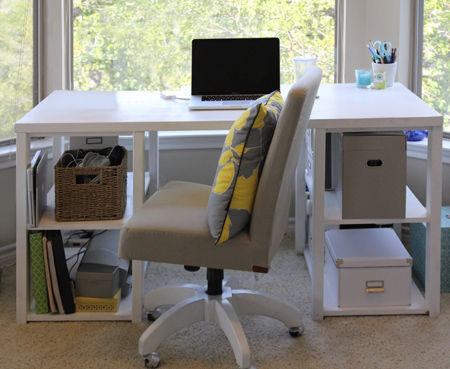
There is something always difficult about assembling your home office or children’s desk from a flat pack, knowing full well that you can create one with more functionality and better suited to your space for a fraction of the cost – not to mention the satisfaction of building this yourself.
Say goodbye to buying flat packed furniture ever again as you build your own office furniture by hand for your own space in the home.
Creating this in three unique sections, you a creating a desk that is not only functional and versatile but easy to move around. You could even put some castors on the base of the legs when you are done so you can push them around.
So, what do you need to make this happen? Here is all the materials and tools you need to build your own home office that will be the envy of all your friends.
Materials for your desk
- 4 of 44 x 44 x 482mm pine – frame sides
- 4 x 44 x 44 x 282mm premium grade dressed pine – frame front/back
- 8 x 44 x 44 x 690mm premium grade dressed pine – legs
- 1 x 610 x 1200mm laminated pine shelving – top
- 4 x 330 x 570mm laminated pine shelving – shelves
- Liquid nail adhesive
- 50 x 4 x 45mm smooth-shank screws
Tools for your project
- Drill/driver + assorted bits
- Pocket hole jig
- Jigsaw + clean-cut blades
- Orbital sander + 120-, 240-grit sanding pads
- Tape measure and pencil
- Drop saw or circular saw
Cut your wood to size
Firstly, we need to cut all our 44 x 44 dressed pine to size. Using a circular or drop saw. If you don’t feel comfortable using one of these, your local hardware store typically will do it for you for a small fee. But if you don’t have all the power tools required, don’t let this stop you, borrow them from a fellow DIY aficionado using toolmates.com.au.
Get your wood sanded
By getting all our timber cut before we kick off our project will not only increase the likelihood you get all the cuts right but that you have everything you need in place ready for assembly.
Now it is time to sand all our sections. Focusing firstly on the bottom edge of the legs, which we want to chamfer or angle giving a neat and professional finish to your legs. Then the shelves and top, to ensure everything is ready to be put together.
Construct the frames


Using your jig, drill your mounting holes on the side front and back of the frames. Don’t worry if you don’t have a pocket hole jig, you can substitute by drilling dowel holes. Using smooth-shank screws attach the side, front and back frames to the top of the legs – see diagram. Use liquid nails to ensure that you have an extremely strong bond.
Mount the shelves


With your jigsaw, cut out a corner section (44 x 44) at each of the shelves, to push for a better functioning and looking shelf. Measure up from the bottom of each leg at 50mm and 435mm and mark each. Each cut out should have a pocket hole inside – not visible from the front – to mount the shelves on the leg.
Attach the top and finish the project


Make a mark on the underside of the top, allowing for a 20mm overlap. Using the ridged plastic brackets secure the top to the shelf – in the centre between the two shelf towers you created.
Finally, give your new project one last sand & apply a stain or paint depending on your preference. Move into place and start enjoying your handy work.
Remember, when you have created the desk you can adjust the frame to create a whole range of other furniture for your home so you can save big bucks on your furniture costs and create bespoke pieces that you can show off to all your friends. Don’t forget to add some personality by adding some paint or stain to your desk so it fits in with your office décor.
As you can see, making some pretty nifty items out of bits and pieces you have laying around in your back garden or shed is simple with ToolMates. With a little bit of initiative, you can make some very cool items that will not only be the envy or your friends but will be super useful for your next gathering.

We hope you enjoy and remember if you don’t have all the tools you need, why not borrow them from someone in your area using ToolMates, why spend money on buying the tools, when you can lend them for a little fee?
ToolMates is the place to hire or rent out tools from individuals in your local area. Rather than spending up big at the hardware store or tool shop, simply search and find people near you looking to hire the tool you have laying around your shed.
What’s the point in having a bunch of expensive machinery hanging around at home when you only use it once or twice a year? With ToolMates, you can rent those tools out to people in your area and make money off your used items! Find out how with ToolMates.
Related Posts
Post a Comment