
Living in Australia, we have a few things that are almost guaranteed in our wonderful country. One guarantee is that if you leave any capital city within a few kilometres, you’ll see sprawling bushland and after the summer storm season there will be a ton of fallen trees left to go to waste.
If you have access to timber that is likely to go to waste, why not repurpose the beautiful Australian logs into functional outdoor furniture for around your fire pit, your backyard or even on your back deck to add some much needed additional seatings for your outdoor summer gatherings.
Log furniture will take you back to your youth, sitting around the bonfire on any log you could find; just this time it will be a beautifully created piece of furniture, created by you! Creating your own log furniture isn’t a tough ask if you have the tools and materials you need to get the job done. In this article, we explore how you can grab some basic tools and a few logs and create the perfect outdoor log furniture for your next gathering.
So, what will you need to make this outdoor furniture that will be the envy of your friends…
Tools
- Belt sander
- Chainsaw
- Paint brushes
- Hammer
- Chisel
- Dremel
- Safety gear – eyewear & breathing protection
Materials
- Logs of between 1 to 3 meters in length
- 40 grit sandpaper
- 150 grit sandpaper
- 220 grit sandpaper
- Clear coat varnish
- Concrete blocks or Pacers with a U shape
- Rebar – to add increased stability
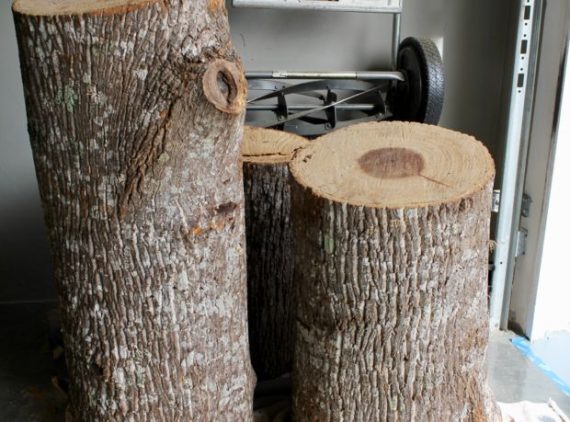
Step 1
nLocate your wood

We don’t have to wait long for a storm in Australia, so if you don’t live on a property where you can obtain some logs, have a look around the local area for fallen trees after a storm that can be repurposed (on a private property ideally so you can ask the owner if you can take them).
Alternatively, if you speak to a local timber yard, or look at GumTree – pardon the pun – for individuals selling firewood, you will be able to find a circular log to the dimensions you are looking for.
Remember, it is always best to get multiples if possible of four or more, allowing you to set up a new communal area to enjoy at your home.
Step 2
nThe waiting game…
Like a good wine, the wood will need to age before you can start creating your magical piece of furniture – so if you are in a hurry, speak to the timber yard, as they will have dried alternatives for you.
If freshly acquired, your logs will need to be aged for around ten to twelve months before they are ready to get stuck into. So if this is the case, find somewhere nice and dry where you can leave your logs safe and sound for between 10-12 months – your work here is done (for now).
Step 3
nGet sanding people!
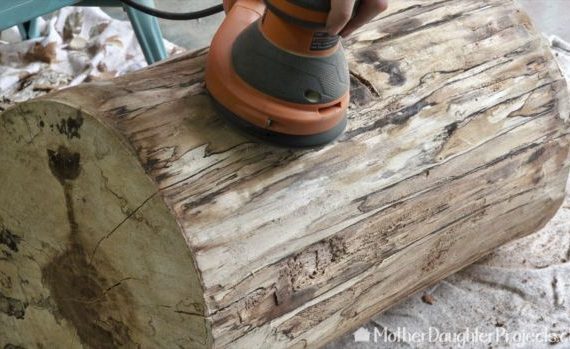
Fast forward 10-12 months and your log are ready to get prepared. You firstly need to take the bark off around the log – which after such a long time, you shouldn’t have too many issues here. If you do a hammer & chisel should allow you to debark quickly.
There will be a lot of grit left from the bark, so as the name suggests if you load your belt sander up with the 40 grit, you can get started.
Remember, with the level of sanding you will be doing, there will be a lot of dust, so ensure you have goggles and breathing safety equipment to use to keep you safe and sound from the dust! With all this in place, enjoy peeling back the layers of your log onion.
Step 4
nKeep sanding!
Once you have removed the layers of fibrous materials, switch over to 150 grit sandpaper then to 220 grit as you move to give the log a smooth finish – which is important for all of those wanting to sit themselves on your creation without getting a splinter.
If you have any cracks or splits in the log, it is best if you use a Dremel to smooth them out so no one or their clothing gets unwittingly caught on your log!
Step 5
nApply your coating
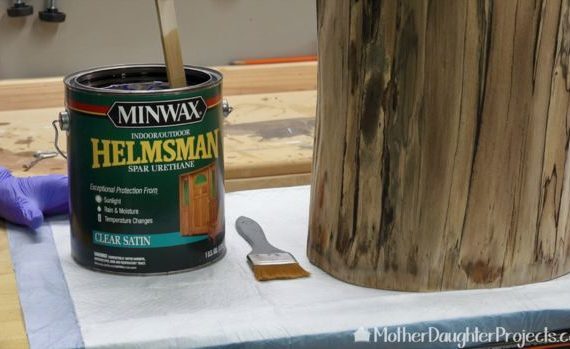
Liberally apply your clear coating to the outside of the logs to apply the finish. It is best if you apply 2 – 3 coats to ensure the logs not only look spectacular but last for longer in the weather and outdoor environment.
Step 6
nArrange your concrete sleepers and logs into place
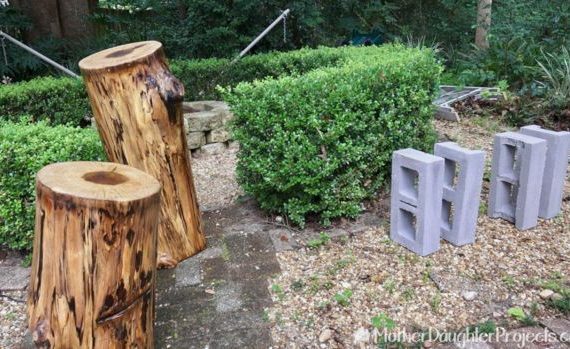
Now you are getting towards the business end of the project, and you will need to go to your local hardware store – more than likely one of the big ones – that will have a large range of paving blocks and options.
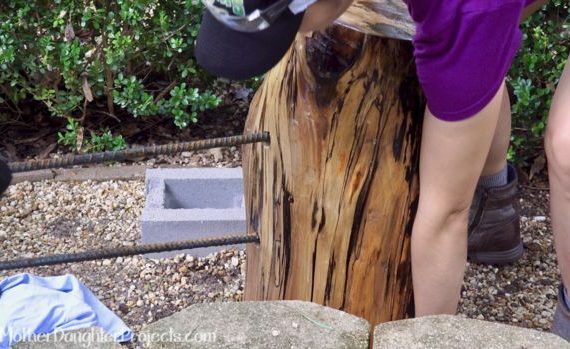
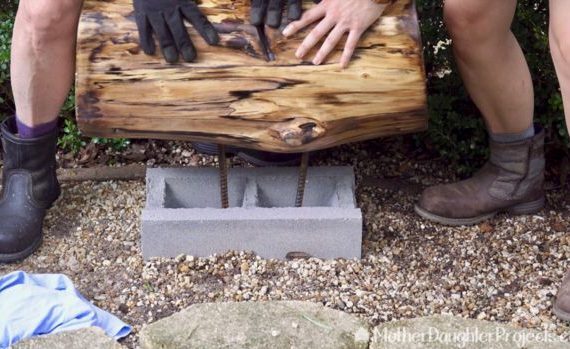
Paving blocks are really inexpensive, however, you will need those with a ‘U’ shape so it can hold the blocks stably, ideally with holes in the middle to allow you to drill in your support bars.
Once you have arranged your pavers where you want them to go, to add stability, drill in rebars into your log and simply push them into the ground in the spaces in the pavers until it sits snugly on the paver and in the ground.
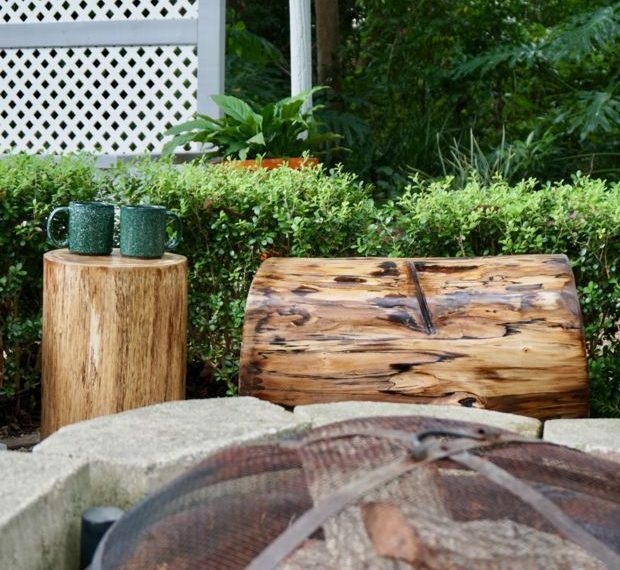
Step 7
nSit back and enjoy your handy work
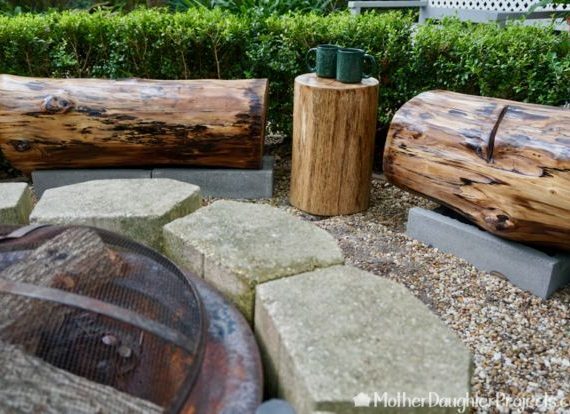
Now you can add additional logs as tables, add additional seats as you require, the choice is yours how you want to configure your concrete and log benches.
Sitting around a fire pit, glass of red in hand and enjoying the during summer nights – on fire ban days of course – let’s face it, you could be doing a lot worse.
If you’re looking for a DIY project Toolmates provides an accessible platform so you can connect with other people in your local area who are willing to lend or borrow the tools you’re not using for a small fee. We’re passionate about creating great items for in and around your house without the need for buying expensive supplies and materials. Most of our projects can be created using things around your shed, allowing you to create masterpieces on your weekend.
Simply log on and create a profile and get your DIY juices flowing with Toolmates.com.au.
Jump on our website and scroll through all the amazing tools available for hire across Australia now.
Related Posts

Post a Comment