For those of us with a canine friend – or more than one – they are part of our family, so why are they eating from anything short of the plates on our table? Only kidding, we are not that mad, but we know that one of the most important things is ensuring that our little four-legged friends have clean food and water in an accessible location.
But at what cost? Ugly plastic bowls get kicked around your home as you rush around your kitchen trying to get out the door to work, not to mention getting dog food and water all over your clean work clothes… you get the picture.
By reclaiming some pallet boards or timber from an old, unused project, you can some amazing looking furniture that you and your pet would be proud of. And who doesn’t want to create something that is bespoke and spectacular for your favourite furry friend to enjoy.
In this article, we share how you can create your very own DIY dog feeding station.
What you will need:
Tools
- Jigsaw
- Miter saw
- Handheld metal detector
- Carpenter square
- Electric nail gun
- Orbital sander
- Clamps
Materials
- Wood glue
- Spay lacquer
- Sharpie marker
- Sandpaper 120 grit
- Pallet boards from one or more wooden pallets
A word on safety
Remember, if you are using power tools, especially if it’s your first time and you’re a borrowing them from a Toolmates member – please ensure you not only have your safety gear, eyewear, ear protection and work boots on, but you understand how to operate any machinery, the owners will give you a demo, they would prefer to spend 10 minutes doing that, that with you in the A&E later on.
Step 1 – Get your materials organised

Select some nice-looking boards with no cracks, we selected a range of 13cm (5.25inch) and 9.5cm (3.75inch) boards that would suit the creation of two different sized dog bowls. We worked to get the straightest edges possible, as we only want to be making ‘cross cuts’, not length cuts on our saw.
You want to be using pallets that are heat treated, as they are safer to use, and don’t grab your blue CHEP pallets from the back of your local Coles or Woolies, as they need to be returned & cost the delivery company money.
Step 2 – The layout of your dog feeding station

As the design is a fairly straightforward box, the dimensions were fairly simple. If you are building something more complicated or a larger box for multiple dogs, then you will need to adjust this.
If you have smaller dogs, then you are going to want something closer to the ground, while those with large dogs will want some more height in the feeder, so you will need to allow for that.
Remember, pallets – especially the ones you can get your hands on easily – often come in different shapes and sizes, so don’t worry too much if the dimensions to match exactly what we have here.
They key is to ensure that you measure the correct size of your bowls and factor that into your plan.
Step 3 – Get cutting

Using your mitre saw, make a small cut to one of the ends, so you know you are working with a straight/square edge. Measuring your cut from that edge and mark up using your pencil. Make the cuts for all boards and ensure that they are straight.
Safety tip: Please ensure you double check for any discarded or hidden nails in the wood as this could cause all sorts of issues when your blade hits them at speed.
Trace the bowl onto the boards, ensuring that you only cut on the inside of the marked line – remembering this is the outside rim, if you cut on the inside of the line the bowl will fall straight through.
Step 4 – Assembly


Using liquid nails first and then a nail, glue and nail the boards together ensuring you clamp everything to stop it from moving around too much while you are assembling or when the glue is setting.
Step 5 – Bowl holes


Trace a smaller bowl or plate on the inside of the current bowl, ensuring there is a protruded edge for the dog bowl to sit on. The difference in size ideally will be about 1cm, but this will vary based on the size bowl you use. Remembering that you want your bowl’s rim to sit squarely on the edge you have created – not falling into the hole, if it does…well…start again.
Step 5 – Sand

Using your orbital or belt sander, with 120 grit, give your feeder a light sand ensuring that the edges are taken back, and all the splinters are removed. Pallets often have a lot of splinters and you don’t want your pet’s nose to get hurt while they are going in for some water.
You don’t want to go to hard on the sanding, as you still want to retain the ‘weathered look’ of the pallet boards where possible.
Step 6 – Accessorise!
Depending on how much bling you and your dog like, you can add anything from a name badge, through to diamantes if that’s your thing.
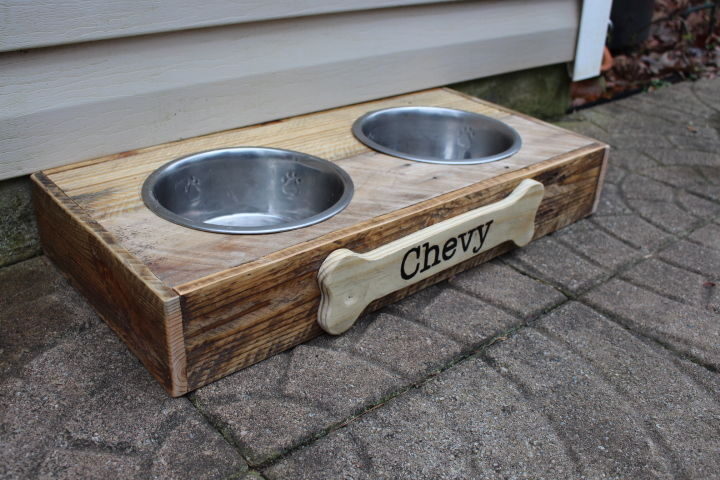
We created a bone shaped sign with the jigsaw, then printed out our dog’s name onto a big of paper, traced it on and went over with a Sharpie permanent pen.
Step 6 – Seal & finish
Sealing with a few coats of spray on lacquer, always being careful not to go too heavy on the permanent marker you have used to write the name, once it is dry, you are then ready to go.
And there you have it, a great looking bowl that not only is functional, but also will ensure your pups dine in style.
If you don’t have all the tools you need, why not borrow them – visit toolmateshire.com.au today and see how a project like this is much easier than you think.
Related Posts
Post a Comment