

If you’re a mad DIY fan, you’ll probably have a chainsaw in your tool shed or at least have the need to borrow one from time to time for projects.
Whether your chain has fallen off or you are just doing a clean and maintenance, knowing how to replace, remove and properly set up a chainsaw chain is an important step in owning power tools.
Knowing how to replace a chainsaw chain can certainly come in handy particularly if your chain comes off mid-project and you want to get cracking on a job.
In this article, we outline how to safely replace a chain so that you don’t have to wait to get on with your project. Replacing your chainsaw chain should only take a few minutes if done correctly, and it’s important if you are going to replace it yourself you know all the steps to ensure the job is done safely.
Materials needed to replace a chainsaw chain include:
- Flat head screwdriver
- Socket wrench
- Chainsaw
- Spare chain
Before you start, it’s important to make sure you purchase a chain that matches your chainsaw and is compatible so check out the measurement, size and types for chain replacement before you purchase your chain.
It’s not a one-size fits all kind of system with chains, so when you find the right chain double check it to make sure it’s correct before you get started.
The steps for how to replace a chainsaw chain are outlined below:
Step 1: Removing your old chain from the chainsaw
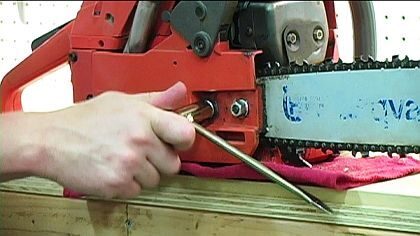
On the side of the chainsaw, you’ll see the side plate, and this will usually have two nuts, which hold everything together. Using a tool such as a wrench unscrew the chainsaw nuts carefully and then remove the plate so you can gain access to the actual chain. If your chainsaw has a brake of some sort, you will need to unlock this before you remove the side plate otherwise it will make it difficult to re-install.
Step 2: Release the chainsaw’s tension
Now that you have removed the side plate it’s going to be easier for you to remove the old chain. To do this, you can simply pull the nose of the chainsaw’s bar away from you and this will work to release the chain from the tensioner. At this stage, the chain will become somewhat slack and you will be able to remove this from the main part of the chainsaw
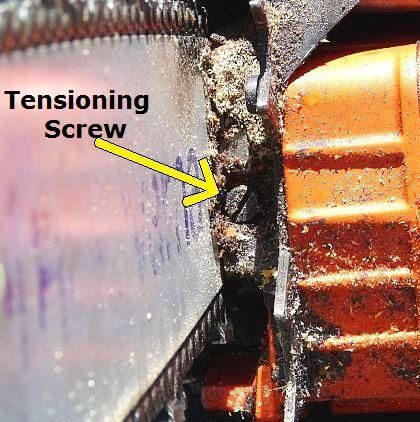
Step 3: Make the tensioning screw loose
Next, you’ll need to track down the tensioning screw, which is usually located on the inside of the guide bar. When you find it, you will need to loosen the screw just a little so that when you put the new chain on it will slip on easily.
Step 4: Threading the chain onto the chainsaw
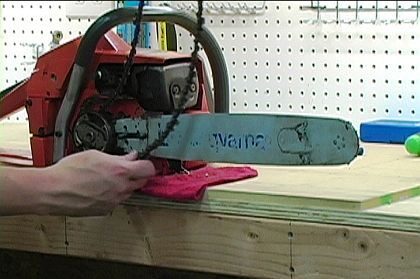
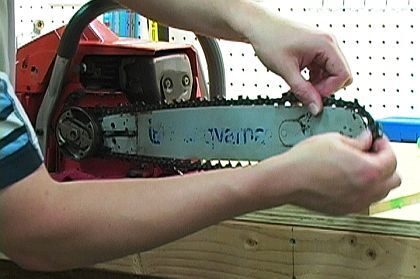
Once you have your new chain ready to go, you can work to thread the chain onto the chainsaw clutch drum. When you are threading this on, it’s important to ensure that each drive link engages into the sprocket and you don’t miss any. Once you have threaded the chain on, you will need to align the guide bar this can be done by putting some tension onto the bar and gently pulling the nose of the chainsaw away from you.
Step 5: Putting the side plate back onto the chainsaw
Now you start working in reverse and put the side plate back onto the chainsaw securely, making sure the guide bar is all level and in the right position beneath. Before you do any tightening of the screws, make sure the guide bar is in the right position, and it can move correctly and is tightened correctly.

Step 6: Tighten everything correctly
As you get towards the tail end of the job, it’s important to not tighten all the screws on the guide bar to ensure everything works perfectly tension-wise.
Check you’ve correctly tightened the tensioning screw at the side of the guide bar and double-check this and the tension before you wrap up the job.
It’s important to be aware that you can sharpen your chainsaw chain a few times before needing to replace it, so rather than going through these steps make sure you have checked if you can do this instead of a full replacement.
A dull chainsaw can mean your projects will experience burning and buckling through the wood and it is a pretty dangerous way to cut, so if you are looking to sharpen your chainsaw you can do it in a few simple steps.
- Using a pair of gloves and a chainsaw filing kit put on the chain brake and clamp the bar in a vice
- Put the guide between the rivets on the chair with the guide pointing towards the nose
- Slowly follow the angle of the top plate and using steady strokes gently file until the chain is shiny again
- Once you have done a couple of cutters, you simply release the chain break, rotate the chain and move the chain so you can start working on more of the cutters – make sure you always reset the brake each time you rotate the chain
- You can use the depth gauge to help you file and make sure the depth gauges are checked so that the cutters reach the wood
- It’s a good idea to resharpen your chainsaw each time you refuel for best results
- Always clean your chainsaw and keep it out of dirt and mess otherwise you will find your cutters get dull quickly and the chainsaw will find it difficult to cut
If you’re looking to hire tools for your next DIY project ToolMates Hire is your one-stop online platform for the sharing of tools all via the comfort of your home.
If you’re looking to do a DIY project using a circular saw, drill, welder, power tools and don’t have the right tools or you have tons of tools and no time to use them we can put you in contact with people looking to hire in your local area so you can make money from the tools you have gathering dust at home.
Whether you have a small DIY project or a big one, we have the tools you need to get the job done.
Simply register, add a tool, details and photo, add the dates the tool is available and confirm and you’re tool is listed on ToolMates Hire as available.
Related Posts

Post a Comment